Showing posts with label Windows. Show all posts

Wednesday, July 10, 2013

How Saved Queries works in Server 2008

      
Windows Server 2003 introduced the Saved Queries node of the Active Directory Users and Computers snap-in. This powerful function enables you to create rule-driven views of your domain, displaying objects across one or more OUs. 

To create a saved query: 
  • Open the Active Directory Users And Computers snap-in. 


  • Right-click Saved Queries, choose New, and then select Query.


  •  Type a name for the query. Optionally, enter a description
  • Click Browse to locate the root for the query. The search will be limited to the domain or OU you select. It is recommended to narrow your search as much as possible to improve search performance.  
  • Click Define Query to define your query.


  • In the Find Common Queries dialog box, select the type of object you want to query.                                                                        
  • The tabs in the dialog box and the input controls on each tab change to provide options that are appropriate for the selected query.

  •  Click OK.


After your query is created, it is saved within the instance of the Active Directory Users And Computers snap-in, so if you open the Active Directory Users And Computers console (dsa.msc), your query will be available the next time you open the console. If you created the saved query in a custom console, it will be available in that custom console. To transfer saved queries to other consoles or users, you can export the saved query as an XML file and then import it to the target snap-in. 

Saved queries are a powerful way to virtualize the view of your directory and monitor for issues such as disabled or locked accounts. Learning to create and manage saved queries is a worthwhile use of your time.

Saturday, June 15, 2013

How to Configure Shadow Copy Service in Windows Server 2008 R2


              This video  about Configuration of Shadowcopy in Windows Server 2008R2..


Thursday, June 13, 2013

Windows Server Backup Step-by-Step Guide for Windows Server 2008 R2

To Install Backup:


                 Click Start, click Server Manager, in the left pane click Features, and then in the right pane click Add Features. This opens the Add Features Wizard.


 In the Add Features Wizard, on the Select Features page, expand Windows Server Backup Features, and then select the check boxes forWindows Server Backup and Command-line Tools.


Then, to access these backup tools, do the following:

                   To access the Windows Server Backup snap-in, click Start, click Administrative Tools, and then click Windows Server Backup.


To Create a one time backup.


Click Start, click Administrative Tools, and then click Windows Server Backup.

From the Actions pane of the snap-in default page, under Windows Server Backup, click Backup Once. The Backup Once Wizard opens.


   On the Backup Options page, click Different options, and then click Next.


On the Select Backup Configuration page, click Custom, and then click Next.


On the Select Items for Backup page, click Add Items. In Select Items, select the Bare metal recovery
check box, click OK, and then click Next.


  • On the Specify Destination Type page, click Local drives, and then click Next.
  • On the Select Backup Destination page, select the attached hard disk drive from the drop-down list that you want to use to store the backup. (You should confirm that there is enough free space on the attached hard disk drive.)
  • On the Confirmation page, review the details, and then click Backup. The wizard prepares the backup set and checks the disk.
  • On the Backup Progress page, you can view the status of the backup.


Wednesday, May 15, 2013

SETTING UP A CONDITIONAL FORWARDER IN DNS

  A Forwarder is a DNS Server to which other DNS Server forward queries.


Types of Forwarders
  o    Standard
  o   Conditional


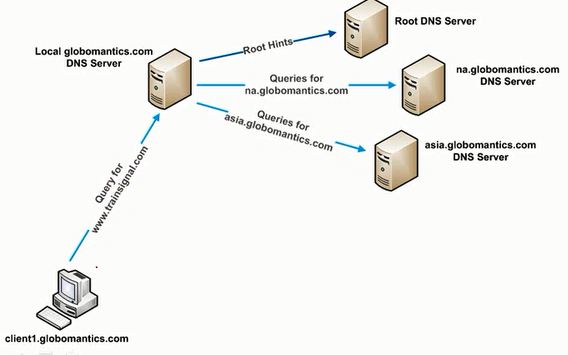
Conditional Forwarder: A conditional forwarder is a DNS server on a network that is used to forward DNS queries according to the DNS domain name in the query. For example, a DNS server can be configured to forward all the queries it receives for names ending with widgets.example.com to the IP address of a specific DNS server or to the IP addresses of multiple DNS servers.

Below figure shows how conditional forwarder is working.


Setting up a Conditional Forwarder:

1. Start -> Administrative Tools -> DNS
2Right Click Conditional Forwarders -> Select New Conditional Forwarder.


3. Type the Condition and IP of appropriate DNS Server, Then Click OK
Eg: Here i have given infotech.com as my condition, If any query which is looking for infotech domain then the query will pass to 192.168.5.2 DNS Server.


SETTING UP A STANDARD FORWARDER IN DNS

  A Forwarder is a DNS Server to which other DNS Server forward queries.

          Types of Forwarders
  o    Standard
  o   Conditional

  • Standard Forwarder: Standard Forwarder is a server that passes the information to other DNS Server, if it doesn't know the answer.
Below figure shows how standard forwarder is working. 


1. Start -> Administrative Tools -> DNS
2. Right Click DNS Server (BG-DC2-2k8) -> Click Properties.
3. Click Forwarder and Click Edit.


     4. Type  the appropriate IP address of DNS Server which you  want to make it as Standard DNSServer.  


 T


5. Apply and OK

Friday, May 10, 2013

Configuring IPv4 and IPv6 Settings Manually from the Command Prompt


                    'Netsh' utility will help to assign an IP configuration to a connection from the command prompt.To assign a static IPv4 address and subnet mask to a connection from the command prompt,type the following, where Connection_Name is the name of the connection (such as Local Area Connection), Address is the IPv4 address, and Subnet_Mask is the subnet mask.

netsh interface ip set address "Connection_Name" static Address Subnet_Mask

For example, to set the IPv4 address of the Local Area Connection to 192.168.33.5 with a subnet mask of 255.255.255.0, you would type the following:

netsh interface ip set address "local area connection" static 192.168.33.5 255.255.255.0 

If you also want to define a default gateway along with the IPv4 configuration, you can add that information to the end of the command. For example, to configure the same IPv4 address for the local area connection with a default gateway of 192.168.33.1, type the following:


netsh interface ip set address "local area connection" static 192.168.33.5 255.255.255.0 192.168.33.1


To assign a static IPv6 address to a connection from the command prompt, type the following, where Connection_Name is the name of the connection and Address is the IPv6 address.


netsh interface ipv6 set address "Connection_Name" Address

For example, to assign an address of 2001:db8:290c:1291::1 to the Local Area Connection (leaving the default subnet prefix of 64), type the following:

netsh interface ipv6 set address "Local Area Connection" 2001:db8:290c:1291::1


Thursday, December 27, 2012

How to Enable Scavenging in DNS Server.

                Scavenging will help you clean up old unused records in DNS. Since "clean up" really means "delete stuff" a good understanding of what you are doing and ahealthy respect for "delete stuff" will keep you out of the hot grease. Because deletion is involved there are quite a few safety valves built into scavenging that take a long time to pop. When enabling scavenging, patience is required.

              Scavenging is particularly important if you use Dynamic DNS to automatically register client host names when their IP addresses change, as is often the case when the clients receive address assignments through DHCP. Over time, client host records in a zone can become stale, and scavenging removes these records. Removing the records improves DNS server and zone transfer performance, and it ensures that host records don't conflict with older records.

In Windows Server 2008, Scavenging is disabled by default. To enable and configure on Windowss 2008 DNS Server, please do the following:

  • Click Start, point to Administrative Tools, and then click DNS. This starts the DNS Server MMC snap-in.
  • On the Action menu, click Properties.
  • Click the Advanced tab, select “Enable automatic scavenging of stale records” and click OK.


  • On the Action menu, click Set Aging/Scavenging for All Zones.


  • Click “Scavenge stale resource records” check box, and then click OK. Default is “7 days
  • In the Server Aging/Scavenging Confirmation dialog box, select “Apply these settings to the existing Active Directory-integrated zones” and click OK.


This should enable scavenging stale Host and pointer records in Windows 2008 DNS server.

Friday, November 9, 2012

LDIF( LDAP Data Interchange Format):    

          The LDAP Data Interchange Format (LDIF) is a draft Internet standard for a file format that may be used for performing batch operations against directories that conform to the LDAP standards. LDIF can be used to export and import data, allowing batch operations such as add, create, and modify to be performed against the Active Directory.


Using LDIFDE to export and to import directory objects:

1. Export the user accounts from the source domain.

      I have created two user account named sam and jaison under domain controller.


At the command prompt , Type:

ldifde -f <file path were  you want save ldf file> -s <server name> -d  "<root domain>"  -p <Search Scope (Base/OneLevel/Subtree)> -r "<LDAP search filter  (Default to "(objectClass=*)")>" -l "<List of attributes (comma separated) to look for in an LDAP  search>"

Eg:  ldifde -f c:/exportuser.ldf -s DC-01 -d "dc=mydomain,dc=com" -p subtree -r "(&(objectcategory=person)(objectclass=user)(userprincipalname=*)(givenname=*))" -l "cn,objectclass,userprincipalname,givenname,samAccountName"


User details imported to  exportuser.ldf file, 

Now I'm deleting both user accounts which i have created.

deleted both user accounts.


2. Import the users from Export to Import:At command prompt, type:ldifde -i<Import Mode> -f <source file location>Eg: ldifde -i -f "c:\exportuser.ldf"


User accounts are restored, this is very simple example to LDIFDE and how it works,