Creating a single user account is an easy task, But if it is more user accounts, For Eg: 300 user's are joining in a short period of time, then its a workload for system admin, he has to create user accounts on time. Insted of creating all user accounts by manually, There is a easy method, which reduces the workload and time. This video is about "Creating bulk user accounts by using Active Directory Scripts".

Showing posts with label Windows Server 2008 R2. Show all posts
Showing posts with label Windows Server 2008 R2. Show all posts
Wednesday, February 19, 2014
Friday, February 14, 2014
Windows Deployment Services (WDS) Installation & Configuration in Server 2012
Windows Deployment Services (WDS) enables you to deploy Windows operating systems over the network, which means that you do not have to install each operating system directly from a DVD or USB drive.
Benefits of Windows Deployment Services.
1. Allows network-based installation of Windows operating systems, which reduces the complexity and cost when compared to manual installations.
2. Supports deploying images for mixed environments including Windows 7and Windows Server 2008 R2 through Windows 8.1 and Windows Server 2012 R2.
3. Uses standard Windows Setup technologies including Windows Preinstallation Environment (Windows PE), .wim files, and image-based setup.
4. Transmits data and images by using multicast functionality.
5. Allows you to create images of a reference computer using the Image Capture Wizard, which is an alternative to the ImageX tool
6. Allows you to add driver packages to the server and configure them to be deployed to client computers along with the install image.
To know more about WDS visit microsoft.. Technet.microsoft.com
Tuesday, February 11, 2014
How to Install & Configure FTP in Windows Server 2012
File Transfer Protocol (FTP) is a standard Internet protocol for transmitting files between computers on the Internet. Like the Hypertext Transfer Protocol (HTTP), which transfers displayable Web pages and related files, and the Simple Mail Transfer Protocol (SMTP), which transfers e-mail, FTP is an application protocol that uses the Internet's TCP/IP protocols. FTP is commonly used to transfer Web page files from their creator to the computer that acts as their server for everyone on the Internet. It's also commonly used to download programs and other files to your computer from other servers.
Thursday, February 6, 2014
Install & Configure IIS 8 in Windows Server 2012
This video is about install & Configure IIS 8 in WIndows Server 2012.
Saturday, July 27, 2013
Universal Group Membership Caching
Universal Group Membership Caching eliminates the dependency on the availability of a global catalog server during logons. When you enable this feature on a domain operating in Windows Server 2003 or higher functional level, any domain controller can resolve logon requests locally without having to go through the global catalog server.
When a Universal group membership is enabled, the Domain Controller will cache the users universal group membership data, the first time user logs on and use it to crate user's token for subsequent logons.
Universal group membership for any users who have logged onto the DC is refreshed every eight hours. The DC can hold universal group membership cached data for as many as 500 users.
The primary reason why you wouldn't want to make a DC a GC in a remote site is that the replication of the global catalog will consume too much bandwidth. For Example, if the bandwidth utilization is already at 80 percent, making the DC a GC could cause utilization peak at 100 percent.
To enable or disable Universal Group Membership Caching follow the steps below:
1. Open Active Directory Sites and Services: On the Start menu, point to Administrative Tools, and then click Active Directory Sites and Services.
2. In the console tree, expand Sites, and then click the site in which you want to enable Universal Group Membership Caching.
3. In the details pane, right-click the NTDS Site Settings object, and then click Properties.


4. Under Universal Group Membership Caching, select Enable Universal Group Membership Caching.


When a Universal group membership is enabled, the Domain Controller will cache the users universal group membership data, the first time user logs on and use it to crate user's token for subsequent logons.
Universal group membership for any users who have logged onto the DC is refreshed every eight hours. The DC can hold universal group membership cached data for as many as 500 users.
The primary reason why you wouldn't want to make a DC a GC in a remote site is that the replication of the global catalog will consume too much bandwidth. For Example, if the bandwidth utilization is already at 80 percent, making the DC a GC could cause utilization peak at 100 percent.
To enable or disable Universal Group Membership Caching follow the steps below:
1. Open Active Directory Sites and Services: On the Start menu, point to Administrative Tools, and then click Active Directory Sites and Services.
2. In the console tree, expand Sites, and then click the site in which you want to enable Universal Group Membership Caching.
3. In the details pane, right-click the NTDS Site Settings object, and then click Properties.

4. Under Universal Group Membership Caching, select Enable Universal Group Membership Caching.

5. In the Refresh cache from list, click the site that you want the domain controller to contact when the Universal Group membership cache must be updated, and then click OK.

Wednesday, July 10, 2013
How Saved Queries works in Server 2008
Windows Server 2003 introduced the Saved Queries node of
the Active Directory Users and Computers
snap-in. This powerful function enables you to create rule-driven views of your domain, displaying objects across one or more
OUs.
To create a saved query:
- Open the
Active Directory Users And Computers snap-in.


- Right-click Saved Queries, choose New, and then select Query.

- Type a name for the query. Optionally, enter a description
- Click Browse to locate the root for the query. The search will be limited to the domain or OU you select. It is recommended to narrow your search as much as possible to improve search performance.
- Click Define Query to define your query.

- In the Find Common Queries dialog box, select the type of object you want to query.
- The tabs in the dialog box and the input controls on each tab change to provide options that are appropriate for the selected query.

- Click OK.


After your query is created, it is saved within the
instance of the Active Directory Users And Computers snap-in, so if you open the Active Directory
Users And Computers console (dsa.msc), your query will be available the next time you open the
console. If you created the saved query in a custom console, it will be available in
that custom console. To transfer saved queries to other consoles or users, you can export the
saved query as an XML file and then import it to the target snap-in.
Saved queries are a powerful way to
virtualize the view of your directory and monitor for issues such as disabled
or locked accounts. Learning to create and manage saved queries is a worthwhile
use of your time.
Saturday, June 15, 2013
How to Configure Shadow Copy Service in Windows Server 2008 R2
This video about Configuration of Shadowcopy in Windows Server 2008R2..
Wednesday, May 15, 2013
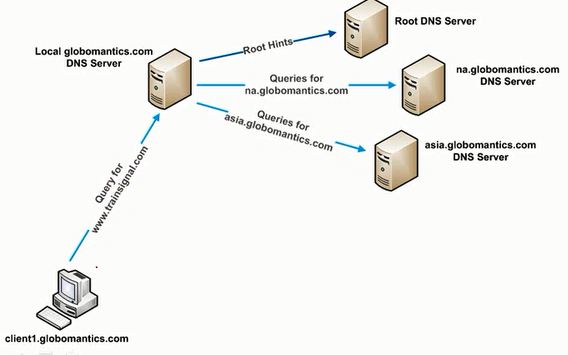
SETTING UP A CONDITIONAL FORWARDER IN DNS
A Forwarder is a DNS Server to which other DNS Server forward queries.
Types of Forwarders
o Standard
o Conditional
Conditional Forwarder: A conditional forwarder is a DNS server on a network that is used to forward DNS queries according to the DNS domain name in the query. For example, a DNS server can be configured to forward all the queries it receives for names ending with widgets.example.com to the IP address of a specific DNS server or to the IP addresses of multiple DNS servers.
Below figure shows how conditional forwarder is working.
Setting up a Conditional Forwarder:
Types of Forwarders
o Standard
o Conditional
Conditional Forwarder: A conditional forwarder is a DNS server on a network that is used to forward DNS queries according to the DNS domain name in the query. For example, a DNS server can be configured to forward all the queries it receives for names ending with widgets.example.com to the IP address of a specific DNS server or to the IP addresses of multiple DNS servers.
Below figure shows how conditional forwarder is working.

Setting up a Conditional Forwarder:
1. Start -> Administrative Tools -> DNS
2. Right Click Conditional Forwarders -> Select New Conditional Forwarder.

3. Type the Condition and IP of appropriate DNS Server, Then Click OK
Eg: Here i have given infotech.com as my condition, If any query which is looking for infotech domain then the query will pass to 192.168.5.2 DNS Server.


SETTING UP A STANDARD FORWARDER IN DNS
A Forwarder is a DNS Server to which other DNS
Server forward queries.
Types of Forwarders
o Standard
o
Conditional
- Standard Forwarder: Standard Forwarder is a server that passes the information to other DNS Server, if it doesn't know the answer.
Below figure shows how standard forwarder is working.

1. Start -> Administrative Tools -> DNS
2. Right Click DNS Server (BG-DC2-2k8) -> Click Properties.
3. Click Forwarder and Click Edit.


T
5. Apply and OK
Friday, May 10, 2013
Configuring IPv4 and IPv6 Settings Manually from the Command Prompt
'Netsh' utility will help to assign an IP configuration to a connection from the command prompt.To assign a static IPv4 address and subnet mask to a connection from the command prompt,type the following, where Connection_Name is the name of the connection (such as Local Area Connection), Address is the IPv4 address, and Subnet_Mask is the subnet mask.
netsh interface ip set address "Connection_Name" static Address Subnet_Mask
For example, to set the IPv4 address of the Local Area Connection to 192.168.33.5 with a subnet mask of 255.255.255.0, you would type the following:
netsh interface ip set address "local area connection" static 192.168.33.5 255.255.255.0
If you also want to define a default gateway along with the IPv4 configuration, you can add that information to the end of the command. For example, to configure the same IPv4 address for the local area connection with a default gateway of 192.168.33.1, type the following:
netsh interface ip set address "local area connection" static 192.168.33.5 255.255.255.0 192.168.33.1
To assign a static IPv6 address to a connection from the command prompt, type the following, where Connection_Name is the name of the connection and Address is the IPv6 address.
netsh interface ipv6 set address "Connection_Name" Address
For example, to assign an address of 2001:db8:290c:1291::1 to the Local Area Connection (leaving the default subnet prefix of 64), type the following:
netsh interface ipv6 set address "Local Area Connection" 2001:db8:290c:1291::1
Thursday, December 27, 2012
How to Enable Scavenging in DNS Server.
Scavenging will help you clean up old unused records in DNS. Since "clean up" really means "delete stuff" a good understanding of what you are doing and ahealthy respect for "delete stuff" will keep you out of the hot grease. Because deletion is involved there are quite a few safety valves built into scavenging that take a long time to pop. When enabling scavenging, patience is required.
Scavenging is particularly important if you use Dynamic DNS to automatically register client host names when their IP addresses change, as is often the case when the clients receive address assignments through DHCP. Over time, client host records in a zone can become stale, and scavenging removes these records. Removing the records improves DNS server and zone transfer performance, and it ensures that host records don't conflict with older records.
In Windows Server 2008, Scavenging is disabled by default. To enable and configure on Windowss 2008 DNS Server, please do the following:
- Click Start, point to Administrative Tools, and then click DNS. This starts the DNS Server MMC snap-in.
- On the Action menu, click Properties.
- Click the Advanced tab, select “Enable automatic scavenging of stale records” and click OK.


- On the Action menu, click Set Aging/Scavenging for All Zones.


- Click “Scavenge stale resource records” check box, and then click OK. Default is “7 days”
- In the Server Aging/Scavenging Confirmation dialog box, select “Apply these settings to the existing Active Directory-integrated zones” and click OK.

This should enable scavenging stale Host and pointer records in Windows 2008 DNS server.
Friday, November 9, 2012
LDIF( LDAP Data Interchange Format):
The LDAP Data Interchange Format (LDIF) is a draft Internet standard for a file format that may be used for performing batch operations against directories that conform to the LDAP standards. LDIF can be used to export and import data, allowing batch operations such as add, create, and modify to be performed against the Active Directory.
Using LDIFDE to export and to import directory objects:
1. Export the user accounts from the source domain.
I have created two user account named sam and jaison under domain controller.
I have created two user account named sam and jaison under domain controller.

At the command prompt , Type:
ldifde -f <file path were you want save ldf file> -s <server name> -d "<root domain>" -p <Search Scope (Base/OneLevel/Subtree)> -r "<LDAP search filter (Default to "(objectClass=*)")>" -l "<List of attributes (comma separated) to look for in an LDAP search>"
Eg: ldifde -f c:/exportuser.ldf -s DC-01 -d "dc=mydomain,dc=com" -p subtree -r "(&(objectcategory=person)(objectclass=user)(userprincipalname=*)(givenname=*))" -l "cn,objectclass,userprincipalname,givenname,samAccountName"


User details imported to exportuser.ldf file,
Now I'm deleting both user accounts which i have created.

 2. Import the users from Export to Import:At command prompt, type:ldifde -i<Import Mode> -f <source file location>Eg: ldifde -i -f "c:\exportuser.ldf"

 User accounts are restored, this is very simple example to LDIFDE and how it works,
 Saturday, October 13, 2012
Offline Domain Join (Djoin):
Offline domain join is a new process that computers that run Windows 7 or Windows Server 2008 R2 can use to join a domain without contacting a domain controller. This makes it possible to join computers to a domain in locations where there is no connectivity to a corporate network.
A domain join establishes a trust relationship between a computer running a Windows operating system and an Active Directory domain. This operation requires state changes to Active Directory Domain Services (AD DS) and state changes on the computer that is joining the domain. To complete a domain join in the past using previous Windows operating systems, the computer that joined the domain had to be running and it had to have network connectivity to contact a domain controller.
Offline domain join provides the following advantages over the previous requirements:

This will create a computer named Client01.

We have to copy the Client01.txt file from server to any portable media (eg: Pen drive) or copy the Clent01.txt file to the workstation which we want add to domain,

We have to execute RequestODJ command in Windows 7 Client PC. Command is


A domain join establishes a trust relationship between a computer running a Windows operating system and an Active Directory domain. This operation requires state changes to Active Directory Domain Services (AD DS) and state changes on the computer that is joining the domain. To complete a domain join in the past using previous Windows operating systems, the computer that joined the domain had to be running and it had to have network connectivity to contact a domain controller.
Offline domain join provides the following advantages over the previous requirements:
- The Active Directory state changes are completed without any network traffic to the computer.
- The computer state changes are completed without any network traffic to a domain controller.
- Each set of changes can be completed at a different time.
First the computer account is created or provisioned on the domain controller and the resulting information is stored in the metadata, and then this information is transferred to the joining computer. The workstation then performs the joining part without having the connectivity with the domain controller.
We need to use Djoin.exe on the domain controller to accomplish above.
Example : Djoin.exe /provision /domain Name_Of_the_Domain_To_Be_Joined /machine Client_Computer_Name /savefile File_Name.txt
We have to execute the above command in Server 2008 R2.

This will create a computer named Client01.

We have to copy the Client01.txt file from server to any portable media (eg: Pen drive) or copy the Clent01.txt file to the workstation which we want add to domain,
Windows 7 machine current not connected to any network.

We have to execute RequestODJ command in Windows 7 Client PC. Command is
Djoin /RequestODJ /Loadfile /e:\Client01.txt {file_Path} /WindowsPath %windir% /LocalOS

After the completion of the command, We have to reboot the windows 7 client machine.


Subscribe to:
Posts (Atom)