Wednesday, May 15, 2013

SETTING UP A CONDITIONAL FORWARDER IN DNS

  A Forwarder is a DNS Server to which other DNS Server forward queries.


Types of Forwarders
  o    Standard
  o   Conditional


Conditional Forwarder: A conditional forwarder is a DNS server on a network that is used to forward DNS queries according to the DNS domain name in the query. For example, a DNS server can be configured to forward all the queries it receives for names ending with widgets.example.com to the IP address of a specific DNS server or to the IP addresses of multiple DNS servers.

Below figure shows how conditional forwarder is working.
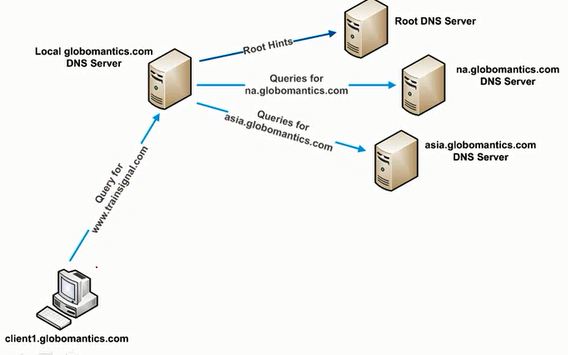


Setting up a Conditional Forwarder:

1. Start -> Administrative Tools -> DNS
2. Right Click Conditional Forwarders -> Select New Conditional Forwarder.


3. Type the Condition and IP of appropriate DNS Server, Then Click OK
Eg: Here i have given infotech.com as my condition, If any query which is looking for infotech domain then the query will pass to 192.168.5.2 DNS Server.


SETTING UP A STANDARD FORWARDER IN DNS

  A Forwarder is a DNS Server to which other DNS Server forward queries.

          Types of Forwarders
  o    Standard
  o   Conditional

  • Standard Forwarder: Standard Forwarder is a server that passes the information to other DNS Server, if it doesn't know the answer.
Below figure shows how standard forwarder is working. 


1. Start -> Administrative Tools -> DNS
2. Right Click DNS Server (BG-DC2-2k8) -> Click Properties.
3. Click Forwarder and Click Edit.


     4. Type  the appropriate IP address of DNS Server which you  want to make it as Standard DNSServer.  


 T


5. Apply and OK

Friday, May 10, 2013

Configuring IPv4 and IPv6 Settings Manually from the Command Prompt


                    'Netsh' utility will help to assign an IP configuration to a connection from the command prompt.To assign a static IPv4 address and subnet mask to a connection from the command prompt,type the following, where Connection_Name is the name of the connection (such as Local Area Connection), Address is the IPv4 address, and Subnet_Mask is the subnet mask.

netsh interface ip set address "Connection_Name" static Address Subnet_Mask

For example, to set the IPv4 address of the Local Area Connection to 192.168.33.5 with a subnet mask of 255.255.255.0, you would type the following:

netsh interface ip set address "local area connection" static 192.168.33.5 255.255.255.0 

If you also want to define a default gateway along with the IPv4 configuration, you can add that information to the end of the command. For example, to configure the same IPv4 address for the local area connection with a default gateway of 192.168.33.1, type the following:


netsh interface ip set address "local area connection" static 192.168.33.5 255.255.255.0 192.168.33.1


To assign a static IPv6 address to a connection from the command prompt, type the following, where Connection_Name is the name of the connection and Address is the IPv6 address.


netsh interface ipv6 set address "Connection_Name" Address

For example, to assign an address of 2001:db8:290c:1291::1 to the Local Area Connection (leaving the default subnet prefix of 64), type the following:

netsh interface ipv6 set address "Local Area Connection" 2001:db8:290c:1291::1


Friday, March 29, 2013

"ആയാളും ഞാനും തമ്മിൽ"

                             വളരെ ആകാസ്മികമായിട്ടാണ്  ഇന്ന് ഞാൻ  "ആയാളും ഞാനും തമ്മിൽ" എന്ന ലാൽജോസ് പടം കാണാനിടയായത്,  എന്നെ ആ സിനിമ  വൈകാരികമായി സ്പർശിച്ചു  അതാണ് ഈ കുറിപ്പിനാധാരം. വളരെ വൈകിപോയി എന്നറിയാം എങ്കിലും പടം കണ്ടപ്പോൾ ഇതു എഴുതാതിരിക്കാൻ മനസ്സ് അനുവദിച്ചില്ല,  എല്ലാ മലയാളികളും തീർച്ചയായും കണ്ടിരിക്കേണ്ട ഒരു ചിത്രം. ഹൃദയസ്പർശിയായ കഥയും അതിലെ, കഥാപാത്രങ്ങളും. വിദ്യാഭ്യാസകാലവും, സൗഹൃദവും, പ്രണയവും, കുടുംബ ബദ്ധങ്ങളും, വളരെ തന്മയത്വതോടുകൂടി അവതരിപ്പിക്കാൻ ലാൽ ജോസിനു സാധിച്ചു. ഒരിടത്തും സിനിമ നമ്മളെ ബോറടിപ്പിക്കുന്നില്ല. ലാൽജോസ് കഥ അവതരിപ്പിച്ച രീതിയും ഔസേപ്പച്ചന്റെ സംഗീതവും പ്രിത്വിരാജിന്റെയും, പ്രതാപ് പോത്തന്റെയും അഭിനയവും എടുത്തുപറയേണ്ടതാണ്. കൂടാതെ സുകുമാരി,നരേൻ, സലിംകുമാർ,സംവൃതാ സുനിൽ ,രമ്യാനമ്പീശൻ , റീമ കല്ലിങൽ എന്നിവരും അവരവരുടെ കഥാപാത്രം ഭദ്രമാക്കി. മറ്റു ചിത്രങ്ങൾ ഐറ്റം ഡാൻസുകൾക്കു പിറകെയും മസാല ചേരുവകൾക്കും പിറകെ പോകുമ്പോൾ അതിൽ നിന്നെല്ലാം മാറി,മറ്റുള്ളവർക്കൊരു മാതൃകയായി,  മലയാളികൾക്ക് ഓരു  ക്ലാസ്സിക്‌ സമ്മാനിച്ച ലൽജോസിനു നന്ദി. തുടർന്നും ഇതുപോലുള്ള നല്ല നല്ല സിനിമകൾ താങ്കളിൽ നിന്നും  മലയാളികൾ പ്രതീക്ഷിക്കുന്നു.


" പണ്ടൊരിക്കൽ അപ്പ എന്നോട് പറഞ്ഞില്ലേ ജീവിതത്തിൽ ഒരു ലക്ഷ്യം വേണമെന്ന്, അതെന്താനെന്നു ഇപ്പൊ എനിക്ക് മനസിലായപ്പാ.അതിൻറെ നൂറിരട്ടിയാണ് ഇപ്പൊ   ഞാൻ  പടിചോണ്ടിരിക്കുന്നത്. "


സുനീഷ് സി . എസ്
ദോഹ , ഖത്തർ 

Thursday, December 27, 2012

How to Enable Scavenging in DNS Server.

                Scavenging will help you clean up old unused records in DNS. Since "clean up" really means "delete stuff" a good understanding of what you are doing and ahealthy respect for "delete stuff" will keep you out of the hot grease. Because deletion is involved there are quite a few safety valves built into scavenging that take a long time to pop. When enabling scavenging, patience is required.

              Scavenging is particularly important if you use Dynamic DNS to automatically register client host names when their IP addresses change, as is often the case when the clients receive address assignments through DHCP. Over time, client host records in a zone can become stale, and scavenging removes these records. Removing the records improves DNS server and zone transfer performance, and it ensures that host records don't conflict with older records.

In Windows Server 2008, Scavenging is disabled by default. To enable and configure on Windowss 2008 DNS Server, please do the following:

  • Click Start, point to Administrative Tools, and then click DNS. This starts the DNS Server MMC snap-in.
  • On the Action menu, click Properties.
  • Click the Advanced tab, select “Enable automatic scavenging of stale records” and click OK.


  • On the Action menu, click Set Aging/Scavenging for All Zones.


  • Click “Scavenge stale resource records” check box, and then click OK. Default is “7 days”
  • In the Server Aging/Scavenging Confirmation dialog box, select “Apply these settings to the existing Active Directory-integrated zones” and click OK.


This should enable scavenging stale Host and pointer records in Windows 2008 DNS server.

Friday, November 9, 2012

LDIF( LDAP Data Interchange Format):    

          The LDAP Data Interchange Format (LDIF) is a draft Internet standard for a file format that may be used for performing batch operations against directories that conform to the LDAP standards. LDIF can be used to export and import data, allowing batch operations such as add, create, and modify to be performed against the Active Directory.


Using LDIFDE to export and to import directory objects:

1. Export the user accounts from the source domain.

      I have created two user account named sam and jaison under domain controller.


At the command prompt , Type:

ldifde -f <file path were  you want save ldf file> -s <server name> -d  "<root domain>"  -p <Search Scope (Base/OneLevel/Subtree)> -r "<LDAP search filter  (Default to "(objectClass=*)")>" -l "<List of attributes (comma separated) to look for in an LDAP  search>"

Eg:  ldifde -f c:/exportuser.ldf -s DC-01 -d "dc=mydomain,dc=com" -p subtree -r "(&(objectcategory=person)(objectclass=user)(userprincipalname=*)(givenname=*))" -l "cn,objectclass,userprincipalname,givenname,samAccountName"


User details imported to  exportuser.ldf file, 

Now I'm deleting both user accounts which i have created.

deleted both user accounts.


2. Import the users from Export to Import:At command prompt, type:ldifde -i<Import Mode> -f <source file location>Eg: ldifde -i -f "c:\exportuser.ldf"


User accounts are restored, this is very simple example to LDIFDE and how it works, 

Tuesday, October 16, 2012

Configuring Active Directory (AD DS) in Windows Server 2012

Before going to the configuration of AD, First we look at the installation of  Windows Server 2012.

Installing Windows Server 2012

The first step is to boot up form  DVD,


You will eventually be prompted to enter a password for the build in Administrator account.

Click Finish.


               Press Ctrl+Alt+Delete to Sign in. and enter your password.

You will be presented with the new Server Manager Screen.


Adding Active Directory Domain Service Role

From the Dashboard click on " Add roles and Features" or Click on Mange you will get the same option "Add roles and Features".


                       Select the "Active Directory Domain Services"

If you want to add additional features, you can add, otherwise click next. 


Click CloseBack to the Server manager , you will notice that AD DS has been  added to the left navigation tree. Click on it and click on more on the right navigation pane.                                                                                                                                


Click " Promote this server to a domain"


You will get below warning in which you can ignore for now.


This computer will likely to restart on its own to complete the installation